I can’t believe I’m already writing a Fourth of July blog post! This last couple of months have flown with my daughter turning two and having a baby…suffice it to say I’ve baked nothin’ in the last few weeks and don’t have any super-fabulous, totally-original July 4th recipe to share with you BUT I do have some past inspiration from my blog and others that are patriotic AND delicious! So here are 10 gorgeous red, white and blue desserts that you can feel proud serving this Fourth of July holiday! Enjoy!
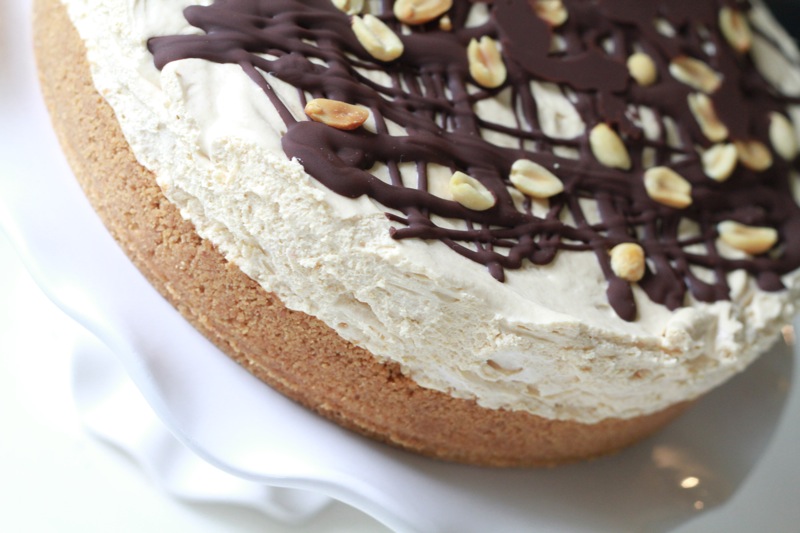
Cheesecake is one of my favorite desserts, if not my all-time favorite. I’ve made a few…Dark Chocolate Cheesecake, White Chocolate Raspberry Cheesecake, Gingerbread Cheesecake, New York Style Lemon Cheesecake and one of my all time favorites and very first recipes, a layered Red Velvet Cheesecake cake. Not to mention a few cheesecake filled cupcakes (here and here). But I have never made a no bake cheesecake and honestly have always been skeptical of the no bake variety. In my mind, it just NEEDS to be baked. But this cheesecake proved me wrong…can you say divine?! First of all, I actually LOVE the fact that this cheesecake didn’t need a water bath and an hour and a half in my oven! And second, it is just as creamy and delicious as the baked variety. Sure, there is definitely a different in texture but it’s not a bad thing at all.
I chose to make this Oreo variation from Life, Love and Sugar. The only difference was adding a bit more Oreos, homemade whipped cream and a ganache to top it off. I took it to a family dinner and it was a huge hit, but cut the slices small because we all agreed it was VERY rich. Perfect with a hot cup of coffee or tall glass of ice cold milk!
In a medium bowl, combine the Oreo crumbs and melted butter. Press evenly into the bottom and up the sides of the springform pan. Let chill in the refrigerator to firm up.
For the Homemade Whipped Cream
In the bowl of an electric mixer (cream will whip better if bowl and whisk are chilled in freezer for 30 minutes), beat the heavy whipping cream until thick and holds shape. Slowly beat in the powdered sugar and vanilla. Set aside in the refrigerator to use for the filling.
For the Filling
In the bowl of an electric mixer, beat the cream cheese, sugar and vanilla until smooth. Slowly beat in the whipped cream. Gently fold in the Oreo crumbs. Pour into the Oreo crust and let chill in the refrigerator overnight.
For the Ganache
Place the chocolate chips in a medium bowl. In a small pan over medium heat, bring the heavy whipping cream just to a boil and immediately pour over the chocolate chips. Let sit for one minutes and then begin stirring until all the chocolate is melted. Let cool for a few minutes. While ganache is cooling, remove sides of the springform pan from the cheesecake. Pour ganache onto the middle of the cheesecake and down the sides. Let cool completely in fridge until ganache is firm. Serve chilled.
I’ve mentioned in a previous post that Jeremy has been wanting me to come up with a homemade protein bar similar to a Cliff Bar or Larabar but of course cheaper and healthier. I tried one that I actually REALLY liked and could hardly keep my hands out of (you CAN get too much of a good thing) but he wasn’t really a fan so I moved onto this recipe from The Balanced Platter shared by my cupcake partner in crime, Robyn over at Gluten Free Crazy. And I can safely say we have a winner with this one! Jeremy loves it, I love it and everyone is getting crazy amounts of protein! It’s very chocolatey, very peanut buttery and soooooo yummy. They’re very rich so I cut them into small squares and keep them in the freezer, although they’d probably be fine in the refrigerator also. Great pick me up and healthy dessert option!
½ c. Cooked Quinoa (I had accidentally mixed my dry quinoa and couscous together so it was a mix of both which I really liked!)
½ c. Thick Rolled Oats
¼ c. Chia Seeds
1¼ c. Chunky, Organic Peanut Butter (or smooth)
¾ c. Agave
1½ Scoops Chocolate Protein Powder
¼ c. Unsweetened Cocoa
4 T. Pure Vanilla Extract
Instructions
Line a 9x9 pan with foil, letting it hang over the edges creating "handles".
In a food processor, chop the dates into very small pieces. Add the almonds and sunflower seeds and process until a meal has formed. Place in the bowl of an electric mixer. Add the quinoa, oats and chia seeds to the food processor and process until a meal forms again. Add to the bowl of the electric mixer. Add the peanut butter, agave, protein powder, cocoa and vanilla to the bowl of the electric mixer and beat everything on low speed until it is well-blended and starts to clump together. Form into a ball and press evenly into the bottom of the 9x9 pan. Freeze for 1-2 hours until firm, lift out of the pan and place upside down on a cutting board. Peel away foil, turn bars over and cut into 1½" squares. Store in freezer.
Today I have given a little makeover to one of my all-time favorite recipes–No-Bake Cookies! My mom’s recipe is seriously THE BEST. Yes, I do think that about many of her recipes. Because it’s true! I’ve had lots of other no-bake cookies and people have no idea there is an exact time they need to boil otherwise you get dry, crumbly, icky no-bakes. Such a shame. Luckily my mom’s recipe uses the perfect ingredients and method and they are no-fail every time.
Like I said, I gave them a makeover…a healthy makeover. I was curious if altering the recipe with alternative ingredients would yield the same delicious cookie I grew up loving and eating way too many of in one sitting. Off to experiment land I went! I wanted them to be dairy-free because we don’t drink cow’s milk or eat cow products in our household unless it’s organic butter or Greek yogurt, so I used almond milk and coconut oil. I knew it could be tricky because coconut oil will only firm up according to the temperature in your house so these cookies needed a little help in that department. You must keep them in the refrigerator or freezer after they are done or you’ll have a sticky mess! But we LOVE them cold, straight from the freezer.
Other changes I made were using a reduced amount of sucanat in place of the refined sugar. It gave the cookies an amazingly rich, dark chocolatey, fudge taste. I also used organic peanut butter and thick-rolled organic oats. Very small changes but they make a world of difference in the nutritional content of the finished product. Don’t get me wrong, you can’t eat five of these at once because they’re “healthy” or replace your daily fruit servings with a bunch of cookies! They still have sugar after all, just not refined, processed sugar. Which is a GOOD thing. These are still meant to be an indulgence, but one you can feel pretty good about. Jeremy and I both love them so much…maybe better than the original! Just don’t tell my mom!
1 c. Organic Peanut Butter (I use one that is only peanuts and sea salt)
Instructions
Line two large baking sheets with foil.
In a large saucepan, combine sucanat, almond milk, cocoa and coconut oil over medium heat. Cook, stirring constantly and bring to a rolling boil. Boil for 1 minute and 15 seconds, stirring constantly. Remove from heat and stir in peanut butter and vanilla. Quickly stir in oats and drop by large spoonfuls onto the baking sheets. Let cool for 5-10 minutes and then place the pans in freezer for about 10 minutes to firm the cookies completely. Store in an air-tight container in the freezer or refrigerator (we like ours really cold from the freezer).
There was a time in my life when if you had told I could blend peanut butter and beans in a blender and get DESSERT out of the concoction, I’d have said you are CRAZY. But oh my how true it is. From brownies to cupcakes, beans are an absolute awesome way to make sweet stuff with less fat and tons more fiber! And you don’t have to compromise taste and texture to get the health benefits, which is nice.
When I came up with this recipe I was amazed how much it tasted like peanut butter fudge! So addictive and good. The short list of ingredients and simple instructions make it a win-win for a healthy, quick dessert! We love these things and I know you will too. Just trying to help you stick to those New Year’s resolutions!
1 c. Organic Peanut Butter (I used one that is only organic peanuts)
⅔ c. Agave (could also use honey)
Pinch of Sea Salt
½ c. Low-Sugar Granola (I used one that is sweetened only with organic apple juice. Try to find one that does not use refined sugar.)
Instructions
Lightly spray a 9x9 pan with cooking spray.
In a food processor, process all ingredients except the granola until completely blended and smooth. Pour into the pan and spread evenly. Cover with foil and refrigerate for several hours or overnight.
Cut fudge into 1½" squares. Working quickly, shape into balls and roll in granola. Store in an air-tight container in the refrigerator.
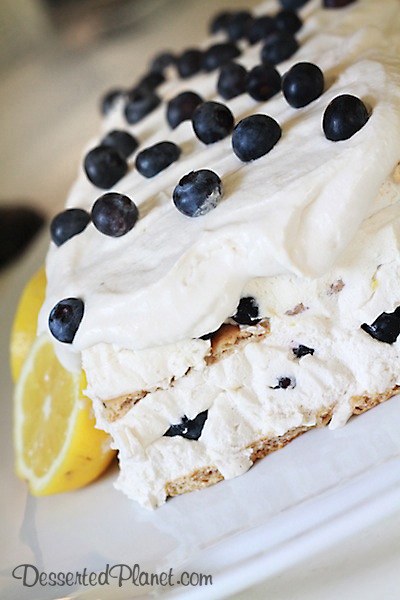
A few days ago I posted some dreamy ice cream treats, one of which happened to be a Strawberry Icebox Cake. As I mentioned in that post, I have wanted to make an icebox cake forever and decided that now was the time! Add in the fact that I had been OBSESSING about making something with blueberries and lemon and voila! This delicious dessert was born.
So, was an icebox cake everything I thought it would be? Ummm, YES. And more. I can see why these things were so popular with our grandma’s back in the day…super simple to make and unbelievably delicious. Once the cake sets overnight, the layers of graham crackers get perfectly soft and the thick, whipped cream filling is almost mousse like sandwiched between everything.
In my humble opinion this is THE perfect summertime treat…simple, gorgeous and bursting with fresh blueberry and lemon flavor! Enjoy!
Note: If you don’t like lemon, feel free to omit it or substitute almond flavor, etc. It’s a very versatile recipe!
4 c. Fresh Blueberries (reserve about ½ c. for garnishing the top of the cake)
Instructions
Line a large, 6½x11x4-inch loaf pan with foil, letting the foil hang over either end of the pan to use as "handles". Spray lightly with cooking spray.
In a chilled bowl of an electric mixer (I chill my bowl and my whipping beater in the freezer for at least 30 minutes), whip 3 cups of the heavy whipping cream on high speed until thick and slightly stiff. Beat in ¾ cup powdered sugar and 4 tablespoons of vanilla. Beat in the lemon juice and lemon zest.
To Assemble
Spread a layer of whipped cream in the bottom of your pan. Place 4 sheets of the graham crackers on top of the whipped cream (they may overlap a bit in the middle and that's ok). Cover the graham crackers in another layer of whipped cream and cover the whipped cream with a layer of blueberries. Gently spread a layer of whipped cream over the blueberries. Cover with 4 more sheets of graham crackers, a layer of whipped cream, blueberries, whipped cream and 4 more sheets of graham crackers. Cover with foil and let set in the fridge for 24 hours.
Before inverting the cake onto a plate, whip the remaining 1 cup of heavy whipping cream until thick and stiff. Add the remaining ¼ c. powdered sugar and 2 tablespoons of vanilla. Place a large plate or platter over the top of the loaf pan and gently flip over. Carefully remove the pan and then gently and slowly peel away the foil. Quickly cover the cake with the whipped cream (see note below) and garnish with reserved blueberries. Slice and serve immediately.
Notes
Serves 10.
Note: I only covered the top of my cake with the fresh whipped cream because I thought all the layers were pretty and wanted them to show.
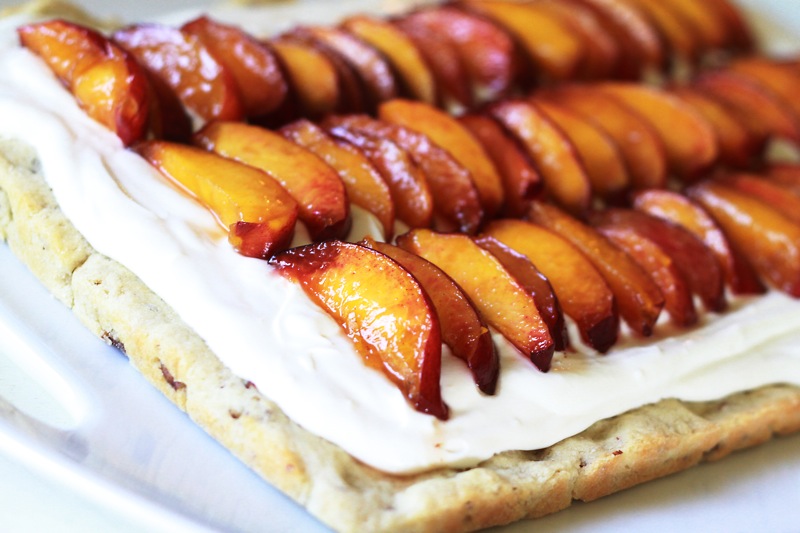
I am so, so, SO excited to share this recipe with you guys. I was trying really hard to come up with a peach recipe that wasn’t a pie or crisp and man, was I having some serious inspiration issues on this one. I wanted something cheesecake-y but NOT baked…the less oven time in the summer, the better, you know what I mean? So I finally had an idea for something fresh and light and just overall yummy. I can honestly say that these peach cheesecake bars are one of my favorite things I have ever made, if not THE favorite thing. Yeah. Good. Really, really, really, good.
The recipe started with this brilliant idea I had for a boozy peach sauce and then it evolved from there to include a buttery, crumbly (but not too crumbly!) shortbread crust and thick, creamy no-bake cheesecake filling. I have to say I could have stopped with the peach sauce…I literally was licking the spoon on this one. It has the perfect combination of warm spices, peach and citrus. Divine. Add in the no-bake cheesecake factor and this is pretty much the perfect summer dessert.
I can tell I will be making LOTS of trips to my farmer’s market this summer. 🙂
1½ Sticks Unsalted Butter, cold and cut into small chunks
2 t. Pure Vanilla
2 Large Eggs, lightly beaten
½ c. Chopped, Toasted Pecans
Cheesecake Filling
1, 8 oz. Pkg. Cream Cheese, softened
7 oz. Sweetened Condensed Milk
1 T. Pure Vanilla Extract
4 oz. Whipped Topping (i.e. Cool Whip)
Instructions
For the Peach Sauce
Make recipe as instructed previously for Champagne Soaked Peach Sauce (recipe was posted on May 30th), letting the peaches drain on a wire rack onto a cookie sheet. Make the sauce as instructed.
For the Shortbread Crust
Preheat oven to 350 degrees. Line a 9x13 pan with foil, letting the foil hang over the edges to use as "handles". Grease the foil.
Whisk together the flour, sugar and salt. Work in the butter with a fork or your hands (I prefer to use my hands) until it resembles fine crumbs. Stir in the eggs and vanilla until all ingredients are mixed together and then fold in the pecans.
Gently press the mixture evenly unto the bottom of the foil-lined pan. Bake for 20 minutes and let cool completely. In the meantime, make the cheesecake filling.
For the Cheesecake Filling
In an electric mixer beat the cream cheese until smooth. Beat in the sweetened condensed milk and vanilla until thoroughly combined. Fold in the whipped topping.
To Assemble
Using the foil "handles", left the completely cool crust from the pan and gently place the crust on a large platter/plate. Spread the cheesecake filling evenly over the crust. Place the crust and filling in the fridge or freezer (I used my freezer) for about 10-15 minutes in order to allow the cheesecake filling to firm up slightly.
Remove from the fridge or freezer and top the dessert with the drained peach slices (as seen in the pictures) and cut into squares. Drizzle each square with peach sauce.
This was my first time making anything sweet with quinoa and can I just say, I am forever changed! Knowing that I can incorporate something into my desserts that is so nutritious and protein packed, is revolutionary. Not kidding. I was definitely skeptical how this would work, but once you mix all these ingredients together, you don’t even know the quinoa is there…all you know is that these balls are DELICIOUS.
I found this recipe on the eat, live, run blog. I used her original recipe but once I had everything mixed up, it was VERY loose and absolutely not sticking together. I might have done something wrong…who knows? But I still thought the mixture tasted AMAZING and decided to just add some more stuff and hope it would come together. The recipe was originally gluten-free but to get it to stick together I had to throw in some white whole wheat flour (which is the only one I had on hand). You could use another type of gluten-free flour though if you have issues with gluten.
In the end, the balls stuck together nicely and tasted sooooo yummy. They seriously remind me of an oatmeal cookie and are definitely my new favorite healthy sweet treat…well, after my No-Bake Almond Butter Rice Krisp Treats. Those things can’t be beat.
1 c. White Whole Wheat Flour (or whole wheat pastry, almond flour, etc)
½ c. Shredded, Unsweetened Coconut
⅓ c., plus 2 T. Raw Sunflower Seeds
⅔ c. Dried, Unsweetened Dark Tart Cherries
⅔ c., plus 2 T. Agave
¼ c. Organic, All-Natural Peanut Butter (no added salt, oil)
1 t. Sea Salt (I use pink himalayan)
2 T. Pure Vanilla Extract
¼ c. Enjoy Life Mini Chocolate Chips
Instructions
In a large bowl, stir together the oats and next five ingredients. In a small pot on the stove, bring the agave to a simmer over medium/low. Remove from heat and stir in peanut butter, salt and vanilla. Pour over oat mixture and mix well until combined. Let cool. Add mini chocolate chips into mixture. Form into 1" balls with your hands. Store in an air-tight container in the refrigerator.
Ok, that title is a little misleading…it is kind of a baked pie, at least the crust is baked. But it stays in the oven for such a short amount of time it hardly counts, hence I christen this pie, no-bake!
I dreamed up this concoction when brainstorming what to make my fabulous sister-in-law Rachel (of foodierachel.com!) for her birthday. I wanted it to be something that she would LOVE not just something that sounded good to me or a new dessert recipe I wanted to try. So I thought of peanut butter first…and then banana, caramel and chocolate. Yes, pretty sure all these ingredients met the “will Rachel love it?” criteria!
I have to say this pie was AMAZING…just the right amount of peanut butter, chocolate, banana and caramel. It is, however, very rich so one slice is more than enough! I made a homemade salted caramel sauce from scratch which I think sent it over the top, but for the sake of simplicity I’d just buy a good-quality caramel sauce if I were you–unless you are feeling very ambitious!
It was a big hit at our family dinner and I’m already looking for an excuse to make this one again!
Preheat oven to 350 degrees. Grease the bottom and sides of a 9-inch springform pan. Combine melted butter and graham cracker crumbs and press into the bottom and up the sides of the springform pan. Bake for 10 minutes and cool completely on a wire rack (I did pop mine in the freezer for a few minutes to speed things up).
For the Filling
In a large bowl, beat the cream cheese and powdered sugar with an electric mixer on high speed until completely smooth. Add peanut butter, milk and vanilla and beat until thoroughly combined. Gently fold in ¾ of the container of the whipped cream, until there are no white streaks left.
To Assemble
Pour the caramel into the graham cracker crust and spread evenly. Place the banana slices in an even layer over the caramel. Spread the peanut butter filling evenly into the pan. Drizzle with the melted chocolate and sprinkle with the dry-roasted peanuts. Place in the freezer for a couple of minutes to allow the chocolate to harden. Cover with foil and freeze for 4-5 hours until mixture is stiff. Slice and serve immediately.
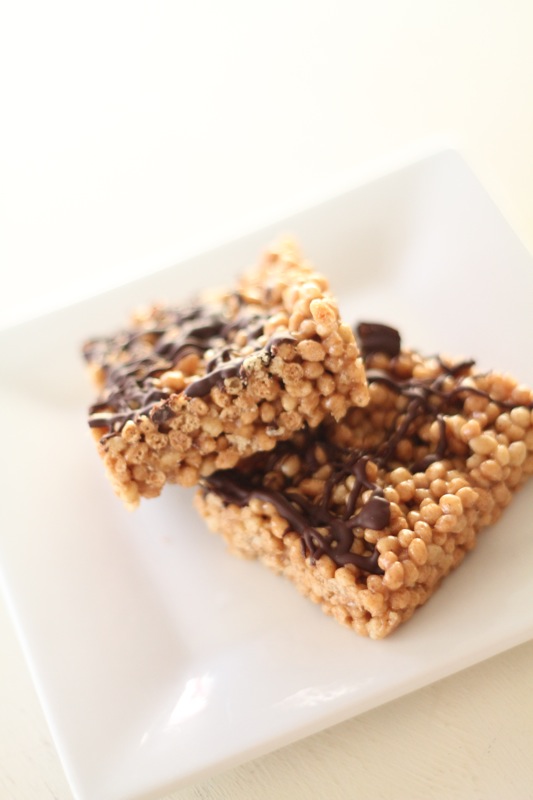
Ladies and gentleman, I may have discovered my most absolutely, favorite, healthy dessert recipe to date! To say these “rice krispie” bars are good is an understatement…they are amazing. Quite truthfully, if given the choice between these bars and oh say a cupcake, I’d choose the bars! Yes, that’s how good they are!
I found this recipe over at ohsheglows.com and just the words “no-bake” and “almond butter” drew me in immediately. I think one thing that made a difference for my bars was the particular kind of brown rice cereal that I bought at our local health food store. It’s made by Enjoy Life Foods and it was so crunchy and delicious in these. I was a little skeptical about the bars holding together without any marshmallow like a typical rice krispie treat but the almond butter and honey works perfectly as a binder. I did leave them in the fridge, just to be on the safe side and I actually liked them cold the best.
½ c. Almond Butter (or any all-natural nut butter you prefer)
½ c. Honey
1 T. Pure Vanilla Extract
1 T. Unsalted Butter
½ t. Fine Sea Salt
3.5 c. Brown Rice Crisp Cereal
⅛-1/4 c. Dark or Bittersweet Chocolate Chips, melted (for drizzle)
Instructions
Prepare an 8x8 baking dish by spraying it with cooking spray.
In a large pot over low-medium heat, add the honey, butter, almond butter and salt. Stir well until combined and heated through. Remove from heat and stir in vanilla extract. Stir in the brown rice crisp cereal until thoroughly coated.
Scoop into pan and spread evenly. Place in freezer to set for about 15 minutes.
Remove pan from freezer and drizzle with the melted chocolate. Place in freezer to harden the chocolate, about 5 minutes. Slice into squares and serve or store in fridge until ready to serve.